Star trails, they are a thing. This one was captured under a moonless, clear sky on November 9th, 2021, as a personal project.
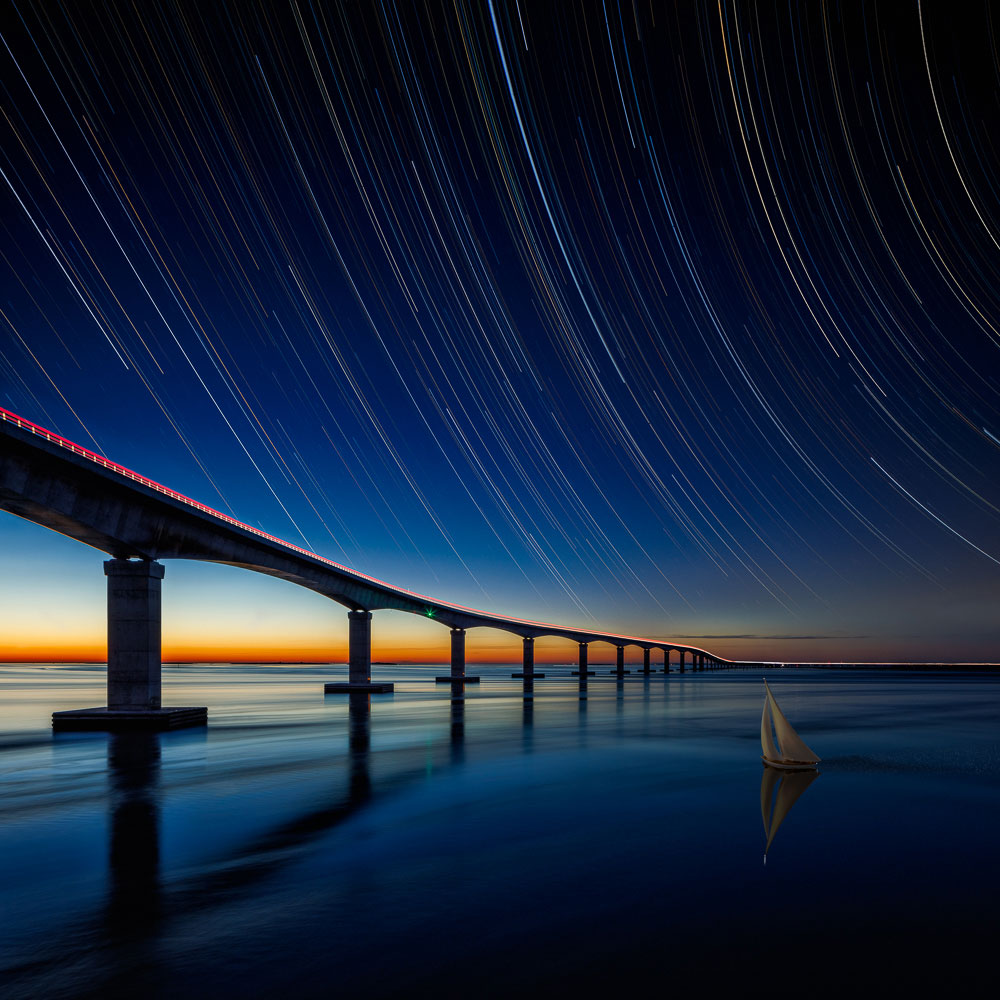
It was taken from the Bonner Pier over the Marc Basnight Bridge, which spans the Oregon Inlet. It’s at the entrance to the infamous Graveyard of the Atlantic on the Outer Banks of North Carolina.
The camera gear was a Canon R5 with the battery grip, a Canon Tilt/Shift 24, a Manfrotto Tripod, a Really Right Stuff BH-55 head, camera tape, a Pluto Trigger, a lens warmer with batteries to last the night, a miner’s light with a red-light option, a camping chair, and a warm favorite brew. My smart phone drives the trigger, so that was fully charged. I took a back-up battery for that too.
The foreground at twilight serves as the base for the star trail. I set my tripod as solidly as possible. The camera was mounted and leveled in both planes using the camera’s level. I wanted the horizon level and the bridge columns vertical. It’s just me. The tilt/shift helps with this. I set focus and taped the focus ring in place with camera tape. I installed the lens warmer and secured it and the power cable. I didn’t want to bump it in the dark of night. I’ll only do that once. The lens warmer battery normally hangs on the bottom of my center column.
Shooting in RAW, I captured the foreground at f/11. For this capture I did a 3 exposure HDR at ISO 100. I wanted the water silky smooth. This setting dragged the shutter to help get that effect. This is the bottom of the star trail. That done I transitioned to the stars.
I used a tilt-shift 24 because it’s a bit faster and is a good clean lens. I shifted the lens up to capture the stars. I did not change my focus. The white balance was set to 4500 degrees kelvin. The key is to have the LCD represent as closely as possible what you see in the night sky.
I opened the lens to f/3.5 and bumped the ISO up just a stop to 200. I did not have a Montana night sky and a higher ISO might have introduced light pollution to the mix. That said, the dehaze feature in Lightroom does an amazing job. The Pluto trigger was turned on, and the camera set to Bulb mode.
This is normally a good time to kick back because the sky isn’t ready to share stars until an hour or so after sunset. I wirelessly connected my iPhone to the Pluto Trigger and set the program to star trails at 2 minutes.
When the light was right, I engaged my phone and started the trigger. I did one test shot at 2 minutes, stopped to check it, then resumed. I let it run until I decided to stop. The choice was mine. The longer the run the longer the trail. This capture was 200 minutes.
I expected to see airplanes flying through MY sky. They were there. I’m sure I expressed some discontent. They are there almost anywhere I go. They’ll be removed in Photoshop or Lightroom later. Once the camera was rolling, I needed something to do. I broke out the chair, the brew and probably got some steps in.
I do monitor my rig to make sure the camera is recording. And I try to ensure the lens isn’t fogging. If the batteries die, I change them and continue, being careful not to move the camera. Any break in the trail can be corrected in Photoshop. Once done, check the images. Shut down everything and pack up.
At home, the images were loaded into lightroom. The 3 exposure HDR was created and touched up, then sent to photoshop. All 100 of the star trail images were reviewed in LR. Adjustments were made, such as black levels and dehaze and applied to all of them. Once all were selected, I clicked on “Photo,” then “edit in”, then “open as layers in Photoshop.” They will load into photoshop in the layer’s pallet. Expect that process to take some time.
I cleaned up the airline trails and some hot pixels in Photoshop. All I did was work from the top of the Layers pallet, selecting a layer, cloning out the airline trails, turning off that layer when done and moving down the stack of images. It was time consuming.
Once complete the top image was selected. Then scrolling to the bottom, the bottom image was shift-clicked to select them all. Then the “Normal” drop-down menu was opened and “Lighten” was selected. In short order all the images were blended to create the trail. I flattened this to 1 image and saved it. It is the top to the star trail.
I then created a new document in PS the same width as the original image, but twice as tall. This gave me some room to work. Each layer was copied and pasted into the new document, with the stars on top and the foreground on the bottom. Since there was overlap, top to bottom, between the images, I was able to reduce the opacity on the top layer and slide it around to align it with the bottom. Then the opacity was restored to 100%, and the excess at the top was cropped out, leaving me with a square image. This is normal for this lens.
I was able to pull one of the time exposures that had a good clean run of taillights on the bridge and masked it into the blended image. I admit to cussing out the truck at the time. Once the blending was complete, I cleaned up any distractions. I took a step back and looked to see what I had. I liked it but felt something was missing. It had leading lines to nothing-in-particular.
A foreground element was missing. A boat would do the trick. Since I’m a former sailboat sailor, I started hunting for one. Long story short, I pulled a pewter model of a sloop off the shelf. I photographed it as if it were lit by the setting sun, added navigation lights, color to the sails and hull, a reflection, and a wake astern to finish it off. Now I had a finished image with a point of interest.
I can’t let this go without a word or two about the moon. It’s up there and can wreak havoc on your session. I’ve learned I can shoot to the North during a full moon and not be bothered if the sky is very clear. I can also shoot to the west when the full moon is rising a couple hours later than my start time. It does a great job of filling in the foreground if you mask its effect into the final version.
So, go play. Spend the night outside while the camera does all the work.


People reacted to this story.
Show comments Hide commentsNice article Steve! ( I was finally able to open and read it)
Comments are closed.