I enjoy the challenge of creating panoramas. When I visited MacArthur Memorial in Norfolk, VA, the clean architectural design inspired me to try a new method taught by master photographer Andrea Phox.
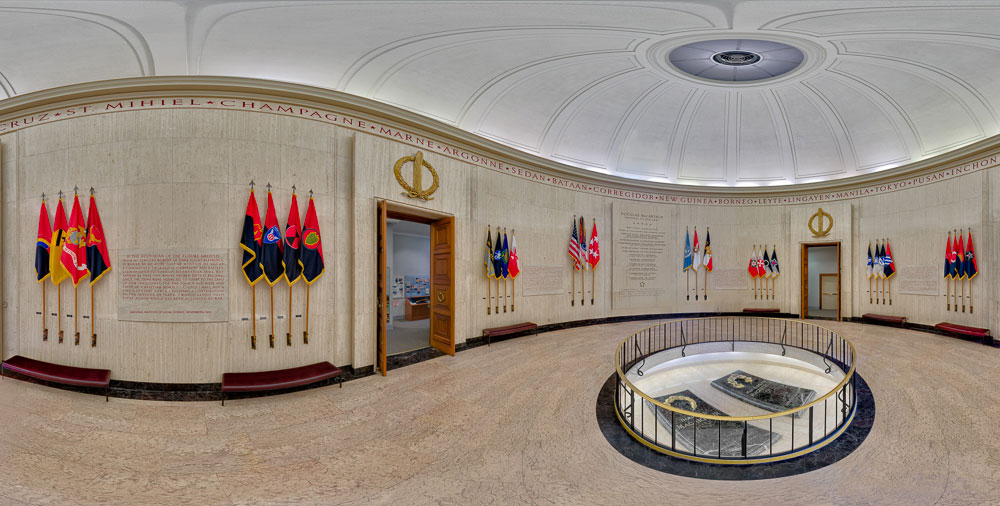
MacArthur Memorial is a museum and research center dedicated to the life of the famed Army General Douglas MacArthur. I began conjuring a plan to make a 360 panorama of the magnificent building.
The capture process utilized a FANOTEC Nodal Ninja 4 pano head, a sturdy Manfrotto tripod, and a Canon R5 in portrait mode, sporting a 17-40mm lens taped down at 17mm.
For the pano head to overlap properly, I had to first determine the ‘no-parallax’ point for the 17mm lens. Without getting into the weeds, this “magic” no-parallax point is simply the entrance pupil of the lens. I want to rotate the lens and camera around the exact point so there will be no shift between the foreground and background elements of the scene. This point sits right above the rotation axis for the head.
I didn’t have unlimited time in the museum, so I couldn’t very well light it. A loaded school bus could have arrived at any time. Once I picked a location within the museum, I leveled the tripod legs then leveled the pano head. Both must be level for the images to stitch together cleanly. Level is everything in a panorama, so this step is a big deal.
The head rotation was set to lock at every 24 degrees using the detent plunger knob for a 1/3rd overlap. I picked the degree adjustment based on my lens focal length and snugged the knob at that position. I would also be tilting the camera 45 degree up and 45 degree down during the process using the pano head’s swing arm.
Since I was going to capture the images using a five-exposure HDR method, I shot a target card using a five-exposure bracket at f/16 at 3,200 ISO for blending the white balance. The aperture stayed the same throughout the entire process for a consistent depth of field.
The shutter speed varies with each exposure during HDR brackets. Some speeds can be quite slow, so I make sure nothing moves the camera. I used a wired remote to help keep the camera steady. It’s just one less time I must touch the camera for each set of exposures.
Since I shot three rows, the first was set to 45 degree down angle to capture as much of the floor and lower wall as possible. I did see the top of my pano head at the bottom of each frame. The next row was a level sweep at 0 degrees. The final set was captured 45 degree up to include the upper part of the wall and domed ceiling.
So, that’s 15 steps around the circle at five exposures each or 75 images for each row for a total of 225 images.
To ensure I completed each row, I adjusted the 360 degree ring at the base of the head to zero at my starting point. It’s the only way I could keep track of where I’d been and how far I needed to go to finish a sweep.
Once the images were captured, they were loaded to a hard drive. Some panoramas can easily exceed three gigabytes.
There are several ways to handle a HDR panorama. I’ve had good luck processing HDR in Lightroom, then exporting to PTGui Pro for stitching the images. One feature that intrigues me is the ability to slide the image back and forth to set my desired composition. It is a circle after all.
Once the images are stitched the final is exported to Photoshop for cleanup and export.