This image of a 1947 Piper Cub was created using a technique called Light Painting. This is a unique method of photography that highlights the subject in a way not possible through any other photography style or technique. It is somewhat complex because of the capture method and assembling the captures in post processing.
We use a continuous LED light wand to make a series of long exposure images of the subject, lighting each area individually. The final image is built by selectively layering and merging the photos in Photoshop. The photoshoot starts at dusk and most of the captures happen after dark because we don’t want any ambient light while we are taking our long exposure captures.
The camera is mounted on a tripod and the desired shot is framed and composed. Then we don’t want to touch the camera until we are done because all the images must line up precisely to stack them in Photoshop later.

The camera I used for this shoot was a Nikon Z7 with a 24-70 lens. We use a small aperture, such as f16, to increase the depth of field. This ensures that all elements from front to back will be in focus.
A software program is used to control the camera remotely, triggering the shutter and making any other changes necessary. There are many software programs available. Camera companies, such as Nikon, usually offer a free software program for this purpose. But you can use a simple wireless remote to trigger your camera too.
I usually make several captures of the sunset as it develops, then we wait for dark to begin lighting the subject. I might also use these pre-dark images for background objects that I can’t light with the LED, such as the airport tower in this image. We will take anywhere from 50-100 exposures, depending upon the complexity of the scene.
When it is dark and we are ready to begin, the camera shutter is opened using the app, then we move the LED light across a specific area, such as a wing, using a slow steady movement to make sure it is evenly lit, then we close the shutter. Yay, one capture!
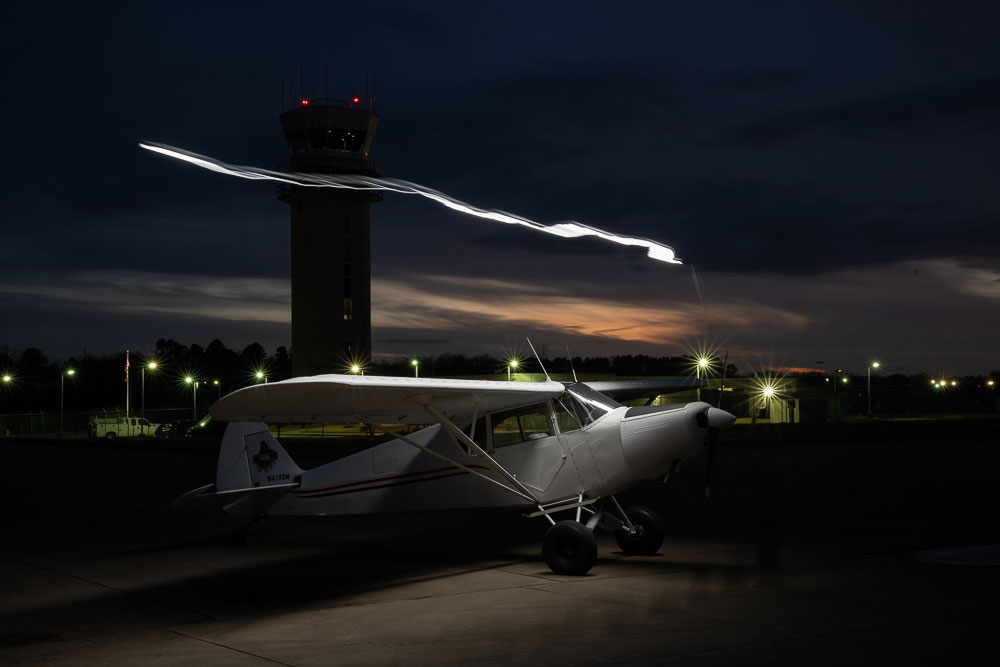
We do this over and over until all areas of the subject and the scene have been captured. Everyone always asks: what about that streak of light? Don’t worry about that, we won’t use that particular part of this image. It will be masked out in Photoshop. While moving the light across the subject, keep it a consistent distance a few feet above the subject. This will create an evenly lit subject and keep that light streak out of the part of the picture we want to use in the final image. Look at your captured image on your tablet to be sure it is properly exposed and evenly lit. If not, do it again! If it’s too bright/over exposed, you need to move the light quicker across the subject. If it’s underexposed, go slower. It doesn’t hurt to do multiple exposures.
I like to do exposures from many different angles. Run the light over the front side of the vehicle, then over the top of the vehicle, then over the back side of the vehicle. You may not use all of these exposures later when building the final image, but it is good to have all the options. I like to have a brightly lit edge on the top of the vehicle with a shadowy falloff down the side.
Click here for a behind-the-scenes picture and video of us creating a long exposure capture at another photoshoot. The LED light we use is a Godox LC500 mounted on a painters pole we bought at a home improvement store.

Also, we will put a light inside the vehicle to get a capture of the interior elements. I have even used a spotlight on a drone to illuminate the roof of a house and the tops of trees. One must be methodical to make sure all areas are captured. If we get home later and discover an area was missed, it’s not possible to go back to get it! So, consider every possible shot. This is a situation where it is good to overshoot!
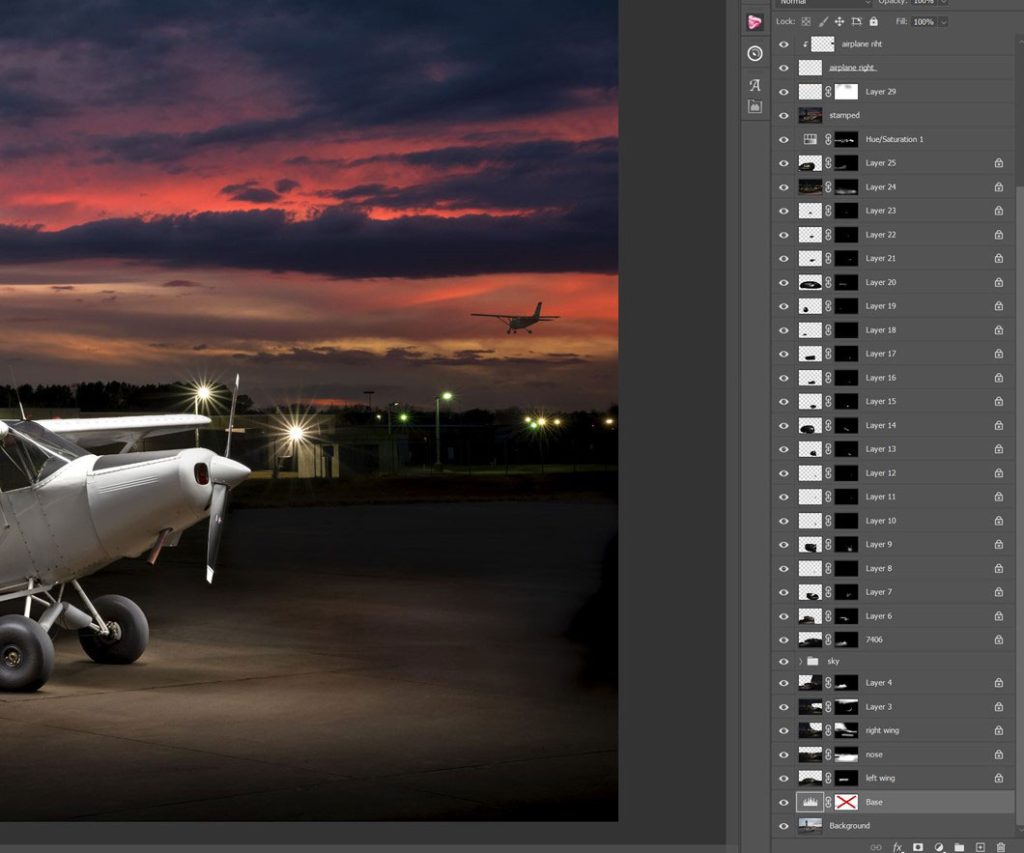
OK, so the photoshoot is done, and we are back home to start creating the masterpiece in Photoshop. To make a long explanation short, open the first image capture in Photoshop and put a black mask on it to hide the image. Then paint with white only the sections we want to show. For instance, for the image above, we would only show the wing. Next, we open the second image as a layer and mask in another section. We keep layering on all the images, one after another, until we get the subject and background looking perfectly lit. Then I make a stamped layer and do any final adjustments like cloning to fix imperfections, enhancing with adjustment layers, and any other final touches to make the image perfect. I will spend anywhere from 4 – 10 hours editing in Photoshop.
Here is a screen shot of the layers palette in Photoshop. There are 47 layers in this project (not all are shown in the screen shot).
Here is a quick youtube video showing the camera captures and photoshop build process
Light painting is a very exciting technique because it looks so different from natural light or flash photography. It requires a lot of practice, patience, and skill, and there are very few photographers who can do it. You must be willing to stay up late and spend hours on the computer merging the images. But the results can be amazing!
If you are interested in learning how to do light painting, I suggest you sign up for a workshop with John Hartman, the master of the technique. Then start practicing.
When I first started I setup still life arrangements and practiced on them. Then I did my own car and our motorcycles. Next, I asked friends if I could do their cars. When I felt confident, I talked to the manager of our small, local airport. I showed him sample pictures and asked if he knew of an airplane I could do for free to get the experience. After I did that one, he loved it so much he had me do this image of the Piper for a friend of his.
The images are very cool and everyone loves them, but I will say it is a very time intensive exercise to get one awesome image. Because of this, you have to charge more for this type of shoot for it to be profitable, and you have to get out and share it with people willing to spend the money on it.
Virtually anything three dimensional can be light painted, such as vehicles, musical instruments, architecture, jewelry, food, commercial products, and art. Use your connections to find interesting vehicles or buildings and offer free photo shoots to get practice. Pretty soon you’ll be the expert!