My photography journey has never followed a conventional path. Most of what I’ve learned has come from hands-on experimentation and a willingness to embrace trial and error-a process that continues to shape my growth as an artist.Throughout the years I have tried nearly every genre of photography in the pursuit of finding the one that called out to me the most. I am always open to testing the waters with a new genre or even experimenting with new techniques.
My philosophy is I will try something at least once before putting it aside as an option. Like photographing a freezing bubble, learning how to create a bubble solution that can form at -15F and then photographing the ice crystals forming. Photographing lightning without any special tools, this approach I don’t recommend though. Curiosity and photography go hand in hand for me.
The Value of Experimentation
Why step outside your comfort zone or chosen genre? Photography is an expansive art form. It’s never just about pressing the shutter. With a camera and a subject, you can manipulate light, experiment with exposure, and explore endless creative possibilities in post-processing. A single photograph can be transformed into a digital painting, and with printing and embellishing, become a multimedia artwork.The possibilities are truly endless-but only if you’re willing to play, experiment, and learn by doing.
The Experiment
With the world slowing down during the pandemic, it felt like the perfect time to revisit the basics.I had decided that to truly understand off-camera flash, I needed to work with just one light until I mastered achieving various lighting scenarios. I wanted to move beyond relying on luck and guessing, so I invested in Joel Grimes’ online Still Life class.
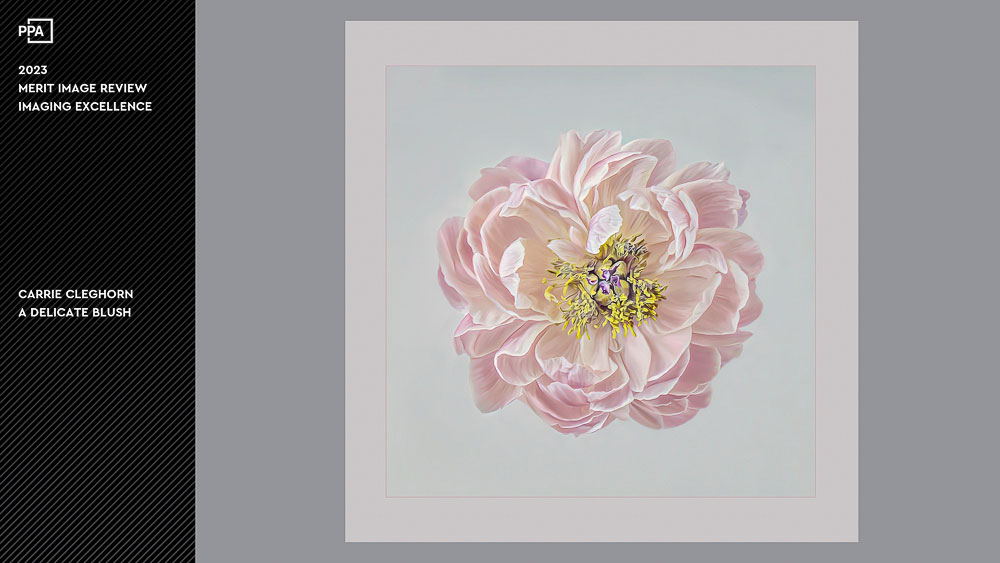
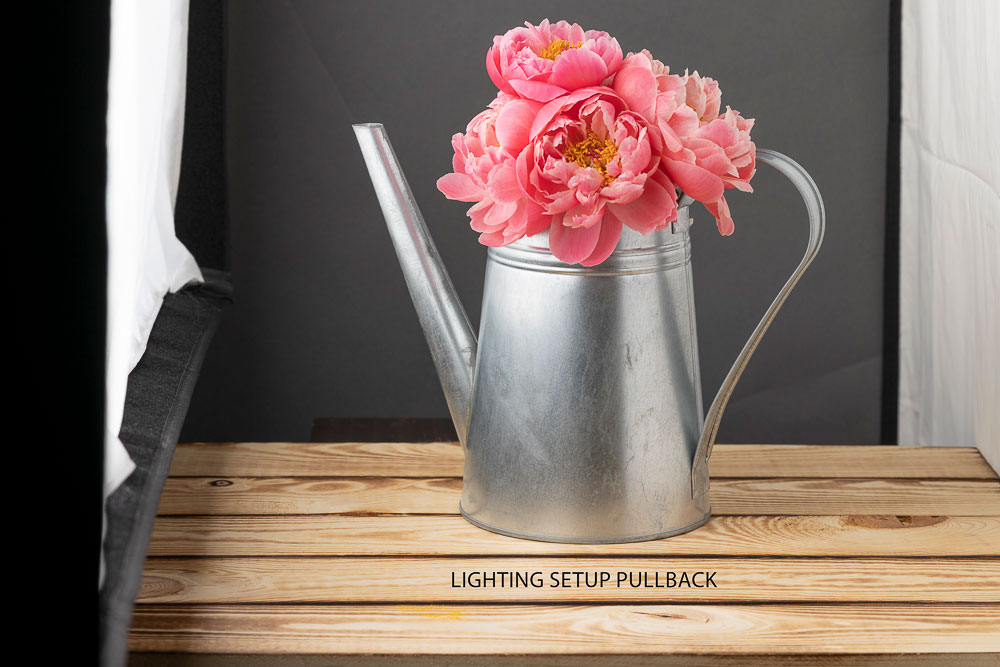
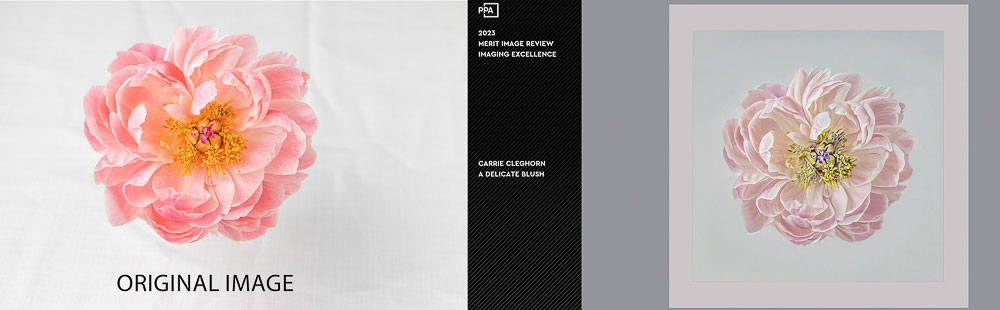
Deconstructing a floral arrangement, I pulled out a beautiful trio of peonies as my subject. I arranged the flowers in various ways on a table with other props to give me a great variety of images. Each change gave me the chance to learn how the light interacted with the setup. For “A Delicate Blush”, I chose to work with a single peony as my subject.
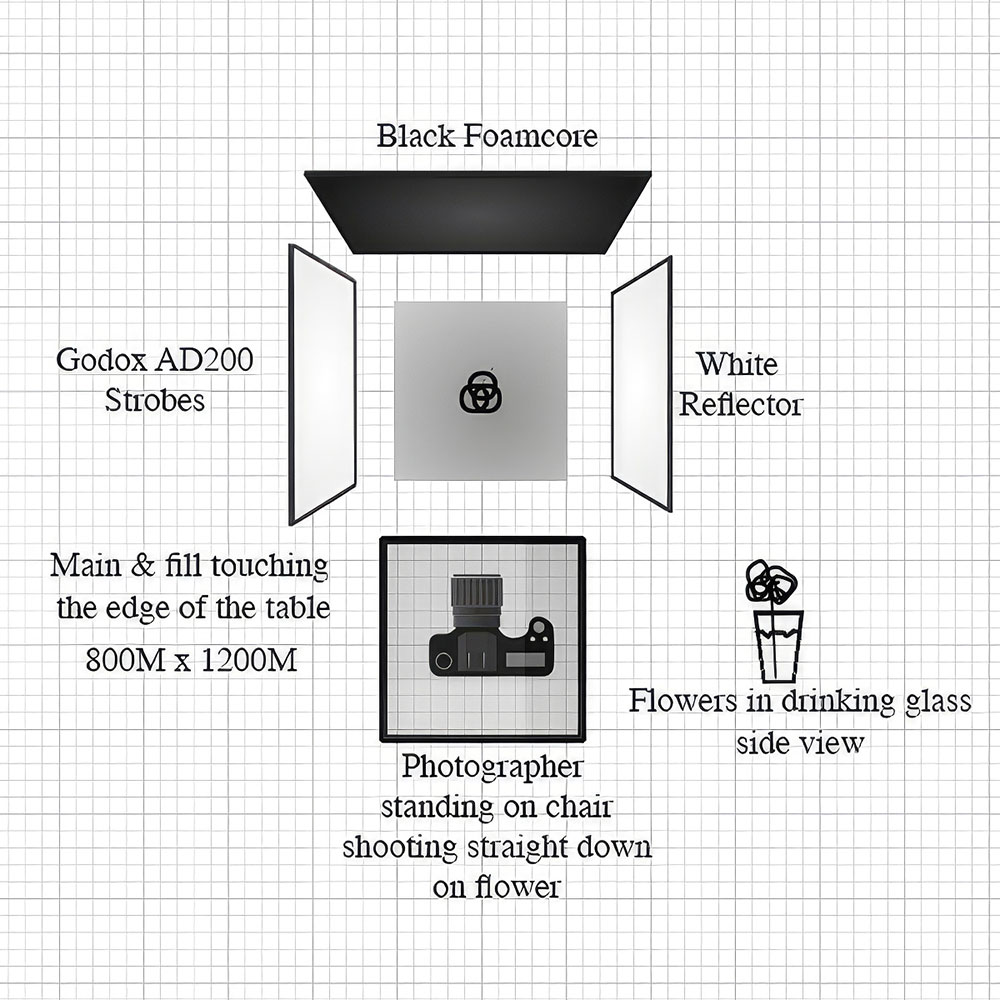
How I Shot It: Standing on a counter-height chair, I captured the scene from a bird’s-eye view
Gear & Setup:
- Camera: Canon EOS R
- Lens: Canon RF 70-200mm f/2.8
- Lighting: Godox AD200 with an 80x120cm (Godox) softbox as the main light
- Reflector: 5-in-1, using the white panel for fill
- Subject: A peony in a small drinking glass, placed on an end table and softly draped with a white curtain
*Camera settings for image – f8.0 ISO 100 1/160 SS at 111mm
After photographing flowers in different setups, I set the images aside for over a year. It wasn’t until I attended a Professional Photographers Guild of Colorado Springs meeting with Sandra Pearce presenting – who demonstrated the Mixer Brush in Photoshop – that something clicked. For the first time, I actually retained Photoshop techniques from a meeting. Since I learn best by doing, this was a breakthrough.
That night, inspired by the demonstration, I came home and tried the Mixer Brush technique myself – even though my Photoshop skills were still limited and I hadn’t yet mastered the Clone tool. After making basic edits to white balance, highlights, and shadows in Lightroom, I wanted to push the image further and give it a painterly quality.
This led me to experiment with Photoshop’s Mixer Brush-a tool I had only recently discovered. After making basic edits to white balance, highlights, and shadows in Lightroom, I wanted to push the image further and give it a painterly quality. This led me to experiment with Photoshop’s Mixer Brush-a tool I had only recently discovered.
How I Shot It: Standing on a counter-height chair, I captured the scene from a bird’s-eye view
Gear & Setup:
- Camera: Canon EOS R
- Lens: Canon RF 70-200mm f/2.8
- Lighting: Godox AD200 with an 80x120cm (Godox) softbox as the main light
- Reflector: 5-in-1, using the white panel for fill
- Subject: A peony in a small drinking glass, placed on an end table and softly draped with a white curtain
*Camera settings for image – f8.0 ISO 100 1/160 SS at 111mm
After photographing flowers in different setups, I set the images aside for over a year. It wasn’t until I attended a Professional Photographers Guild of Colorado Springs meeting with Sandra Pearce presenting – who demonstrated the Mixer Brush in Photoshop – that something clicked. For the first time, I actually retained Photoshop techniques from a meeting.
Since I learn best by doing, this was a breakthrough.That night, inspired by the demonstration, I came home and tried the Mixer Brush technique myself – even though my Photoshop skills were still limited and I hadn’t yet mastered the Clone tool. After making basic edits to white balance, highlights, and shadows in Lightroom, I wanted to push the image further and give it a painterly quality.
This led me to experiment with Photoshop’s Mixer Brush-a tool I had only recently discovered. After making basic edits to white balance, highlights, and shadows in Lightroom, I wanted to push the image further and give it a painterly quality. This led me to experiment with Photoshop’s Mixer Brush-a tool I had only recently discovered.
Embracing New Tools: The Mixer Brush in Photoshop
The Mixer Brush is a specialized tool in Photoshop that allows you to blend and mix colors directly on your canvas, simulating the look and feel of traditional painting techniques like oils or acrylics. When used on a photograph, the Mixer Brush lets you “paint over” the image, blending its colors and adding brush stroke textures for a hand-crafted, artistic effect.
How the Mixer Brush Works:
- The Mixer Brush picks up color from your image and mixes it with other colors as you paint, giving you control over how much the brush interacts with the existing pixels versus new paint you add..
- Key settings include:
- Wet: Controls how much the brush picks up and blends paint from the canvas.
- Load: Determines how much paint is on your brush.
- Mix: Sets the ratio of canvas color to brush color.
- Flow: Controls the rate paint is applied.
- Wet: Controls how much the brush picks up and blends paint from the canvas.
- For digital painting, it’s common to work on a new layer above your photo, allowing you to blend and stylize sections non-destructively.
Typical Steps I Followed:
- Opened the photograph and added a new blank layer above it.
- Selected the Mixer Brush from the toolbar.
- Set my brush settings for a painterly look: Wet 100%, Load 1%, Mix 100%, Flow 50%, and checked “Sample All Layers” so the brush picked up color from the photo layer.
- Began painting over the photo, using brush strokes to blend and stylize the image. The direction and style of my strokes shaped the final effect.
- Used a Intuos Pro Medium Wacom tablet for greater control and more natural brushwork, especially for fine details.
Unlike Photoshop’s artistic filters, the Mixer Brush gives hands-on, creative control-allowing for unique, painterly effects that look more natural and less mechanical. With this tool, you can simulate real-world painting techniques, mix multiple colors, and build up texture and depth as you work.
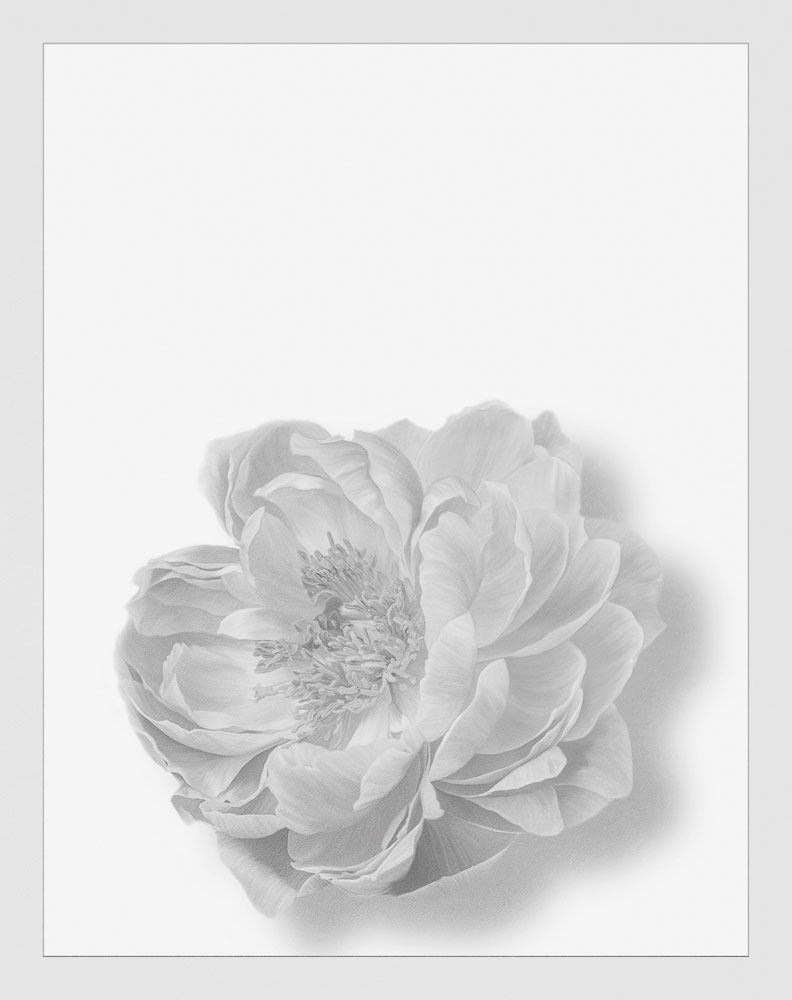
Here’s another version from the same flower, processed with the same painterly method.
I’m always exploring new territory in photography. This art form is constantly evolving, and my curiosity and passion for photography keep me inspired to keep learning and growing. I encourage every photographer to embrace new techniques and never stop experimenting-you never know where your creativity might take you!
Have you tried turning your photographs into digital paintings? What tools or techniques have inspired your own creative breakthroughs? Let’s keep experimenting together.