Intro by Skip Cohen
This is a very different post from what we normally share on the Marathon Blog, but it’s so loaded with great content and tips.
Nicole Begley’s blog, Hair of the Dog, is all about pet photography. There’s a lot of great content, all timeless in its relevance to helping you become a better business owner and artist.
While the topic might not be new to many of you, I love the way Nicole has shared examples and even a few tips to help raise the bar on your skill set. Many of you lock into one favorite lens. After time too much of your work looks the same.
Life begins at the end of your comfort zone!
Author Unknown
That’s one of my favorite quotes, but it’s not only life that begins, but creativity, business growth and your skill set.
Remember, in the hierarchy of why people hire a professional photographer in the portrait/social categories the top three reasons are brides, babies and pets! What’s even better is the potential for overlap within each group. Brides start families and families have pets! You have multiple opportunities to build strong working relationships with every client.
By Nicole Begley
Lens choice consists of so much more than the distance to your subject, it can drastically affect the entire look and feel of your image.
First, let’s go through the common lens focal lengths…..
Fisheye or Ultra-Wide Angle: 8-15mm.
These lenses have a 180-degree view and they drastically distort the environment by bending buildings, trees, or the earth itself. These lenses are challenging to shoot with as they will pull and distort any part of the subject that is near the edge of the frame. (I rarely shoot in sessions with this lens, but it is fun to play with at the beach…..hence, an image of my daughter instead of a furry four-legger.)

Wide-Angle: 24-35mm
Distortion is still present in these lenses, but not to the cartoonish effect of the fisheye lens. It pays to always be aware of where your subjects are in the frame if using a wide-angle lens. Distorted dog…funny. Distorted owner…not so much. This is a great lens for capturing environmental portraits or for getting up-close to your four-legged subject to create a bobble-head effect.

Normal Lens: 50mm
A 50mm lens is called a “normal” lens because it most closely mimics how the human eye sees the world. This lens is good for shooting portraits in limited spaces when you can’t have a longer focal length and the lenses with a large aperture opening of 1.8, 1.4, or 1.2 are good for low light or indoor photography. Your depth of field will be pretty small at those apertures though so it’s important to pay attention to that and is beneficial to work with additional lighting if needed.

Telephoto Lens: 70-200mm+
I have become addicted to my 70-200 f/2.8 lens, absolutely addicted and I can guarantee that it is used in EVERY session I shoot unless I am in a literal shoebox. The reason for choosing this lens so often is not that I need to be further away from my subject. In fact often times I would prefer to be a little closer, but the compression, isolation, and separation this lens provides makes it so worth it to back up and shoot at 200mm. In addition, the longer lenses provide very little distortion making them provide a more true representation of the dog, horse, or person you are photographing.

I highly recommend visiting this article on Photo Matters to play with a cool tool that shows the differences between the same image shot at different focal lengths.
Are you shooting in a busy urban environment and you want it to look like you are in the fields?
Easy. Find a patch of grasses or landscaping and pull out the longest lens you have. Slap that puppy (your 70-200 lens…not the actual puppy) on your camera and shoot at 200mm and fairly wide open around 2.8 or 3.2. Check to make sure the nose to ears of the dog are in focus and adjust your aperture accordingly. By using the long telephoto lens the field of view is just a little sliver of what you would see with a wide-angle lens.
For instance, if the field of view is 180 degrees at 8mm, then it would be around 8 degrees at 200 mm. (**I couldn’t find the exact stats on those numbers so they are estimations used for illustrating this concept.) This is a key that allows you to take the most mundane and random environments and make them lovely portrait locations.

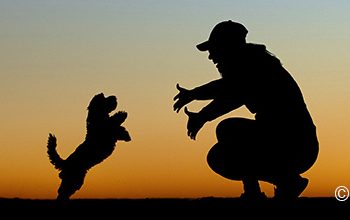
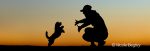
The image above was shot at the location below with my 70-200 at 200mm 2.8. The image below was shot at 24 mm, also 2.8. The difference is incredible.

Do you want a more bokeh-licous background?
Again, pick up the longest lens that you have. It compresses the background, and throws the background out of focus, and gives you incredible separation between your subject and your background.
There are three tools responsible for creating lovely bokeh with shallow depths of field and they all have a place in the photographer’s toolbox.
- The aperture of your lens. This is the most obvious. Choose a lens with a low f-stop number or wide opening aperture. The wider the aperture the shallower the depth of field.
- Get closer to your subject. The closer your lens is to your subject, the more shallow your depth of field.
- Use a longer lens. A 200 mm lens at 2.8 has a much shallower plane of focus than a 24 mm at 2.8.
- The distance between the subject and your background. The further your background is from your subject, the further outside the plane of focus it will be and the more bokeh you will have.
I feel that it’s important to stress that a teeny tiny plane of focus should not be the end goal of all of our images. Many photographers, myself included, start out thinking that it’s totally fine for every image to have the eyes in focus but not the dog’s nose.
While I think that one or two images with a very strong selective focus like that can be fun, an entire gallery of out of focus noses is not something that I want to deliver to my clients. Since every situation is different and there are so many factors that go into your depth of field the best way to improve is to get out there and practice.