Have you ever thought about color calibration with your monitor but got confused after reading or watching a video about it? Sometimes the information can get overly technical right? All you want to do is calibrate your monitor not launch a rocket to the moon!
What is Calibration?
Have you ever walked into a store’s electronic department to look at TVs and notice they all vary in color? In short, calibration is a mutually agreed color and density meeting point for everyone’s images. This is the standard your lab is set for and you are meeting them there.
The software removes any color cast from your screen, helps optimize the brightness/contrast/color output, and creates a profile describing how your monitor displays color. Photoshop, lightroom, and any other software you have then use this profile when displaying images to give you the most accurate color display possible.
Benefits of Calibration
- Total control of your image’s color and density.
- Save money with your lab.
- Files sold to customers are professionally balanced.
So let’s simplify this. All you need are 3 things –
- A monitor that can be calibrated.
- A calibration device
- A color-balanced light source to match the color and intensity as your monitor to evaluate your test prints.
Let me be clear, this is not the same calibration as just using your computer’s internal tools where you open a window with the Display Color Calibration tool that steps you through the following basic image settings: gamma, brightness and contrast, and color balance. While that might get you close, your true color and density control involve using a calibration device.
Colorimeters
While there are many different calibration devices that will do the job, my personal favorite is the X-rite i1 Display Studio Colorimeter, available at your favorite photography retailer for about $169 as of this writing.
Monitors
What about your monitor? If your monitor is getting a bit of age (beyond 3 years or more) you might want to consider a new one. This doesn’t have to break the bank to get a high-quality monitor. The monitor I work with is a Dell U2412M 24”. I run it off of my laptop and it was recommended by one of our IT guys here and now I see why. It has a gorgeous display and holds its calibration beautifully. They run about $500 as of this writing.
Want to do a little more research on what to look for in a monitor for photo editing? Check out this by Viewsonic – how to choose a monitor for photo editing – https://www.viewsonic.com/library/photography/how-to-choose-best-monitor-editing/. Also, here’s the list of the top 5 monitors for 2022 – https://www.cnet.com/tech/computing/best-monitors/
People often ask me if I can calibrate a laptop monitor. You can but personally, I have not found that to be as dependable or as accurate as my external monitor. If anyone has any comments on monitors or laptops, please leave them in the comment section.
The Calibration Process
Marathon recommends these colorimeter settings as the target prior to running your calibration:
White Point = D6500
Color Space – sRGB IEC61966-2
Luminance – 120
Gamma – 2.2
Follow your software instructions to execute and once it’s complete you’ll be able to name your profile. I usually include a date in the name i.e. – Marathon31822. It’s important to recalibrate every few weeks. More frequently if you have an older monitor. Many colorimeter software gives you the option to remind you after a certain number of weeks of your choice.
Light Source
Having a proper light viewing station to evaluate your prints next to your monitor is key. You want to look at your images under the same color temperature and intensity as what your monitor displays. Without this, you will be chasing an ever-moving target and get mighty frustrated.
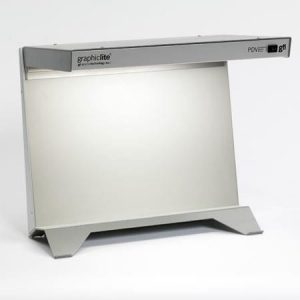
You can either spend several hundred dollars on a professional light viewing station like the Graphic Lite PDV- 2e. Read more details here – https://www.gtilite.com/products/desktop-color-viewing-stations/pdv-professional-desktop-color-viewers/ or go budget and spend less than $50. Here’s what I used:
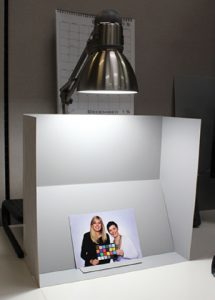
Patriot Lighting, Alvar Architect Lamp for $17.
Sylvania Ultra LED 60-watt daylight bulb that produces 800 Lumens = $8.
Viewing station out of gray artboard from Hobby Lobby – $10
Viewing Station Dimensions:
Height – 14 inches
Width – 15 inches
Depth – 6 inches
I found that in order to match the luminosity of the print to what I was seeing on my monitor, I placed my lamp about 18 inches from tabletop to bulb. I metered the lumens at ISO 100, 1/15 sec. F 8.0. Yours may vary, but that’s a starting point for you.
Test Prints
After you get your monitor calibrated you are ready to analyze your images and make adjustments. Then you can submit your test prints to Marathon Press. You get 10 free 8×10’s to use for samples. If you don’t already have the two Marathon Roes versions already you can download them here –
Marathon Roes (for studio portrait products.) – https://www.marathonpress.com/download-marathon-roes/
VPS Roes (For sports and school volume photography, etc.) – https://www.marathonpress.com/volume-photo-software-downloads/
Here’s a little tip to get the most out of your test prints – consider making an 8×10 canvas in Photoshop and putting a variety of 4 – 4×5’s into each canvas. Mix it up with a high key, low key, outdoor, colorful, black and white, and anything else that represents the style of photography you do. You can still include a full 8×10 of a few images but you can maximize your test this way.
When doing your test prints in Marathon Roes you’ll have the wonderful variety of museum-quality Bella papers to try out as well! You’ll be able to compare the different papers side by side with the same images to see how the paper and textures compare.
Have any questions or need calibration help? Feel free to contact me at 800-228-0628 ext. 283. I am happy to walk you thru the process as you do it. And if you’d like me to look at a few of your files prior to submitting I can see if you are in the ballpark.
Happy calibrating!















People reacted to this story.
Show comments Hide commentsThis is so helpful! My monitor is due for an updated calibration and this just made it so easy and doable. Thank you
Comments are closed.